Lecture 15 - (ST: LLM)
Special Topic: LLMs & Generative AI
Today’s Topics:
Large Language Models
Transformers
Hugging Face
Ollama
!pip install transformers datasets accelerate evaluate bitsandbytes peft huggingface_hubLarge Language Models
Large language models are a type of deep learning model that is understood be both very large in size (number of parameters) and also trained on very large datasets. Lately, the datasets used to train LLMs have grown increasingly in size and it is not unusual for these to represent double digit percentages of the web.
LLMs are a type of deep learning model, also known as a neural network, a type of machine learning model that seeks to imitate the structure of the human brain. Traditional deep learning models take inputs - structured data found in rows and columns like in a database, or unstructured data like images, video, audio.
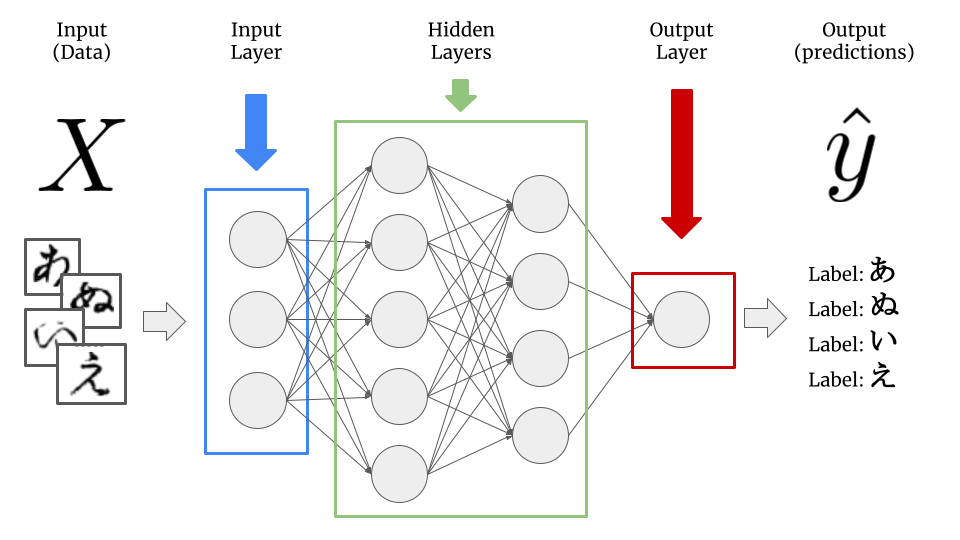
Deep learning models are composed of layers, each of which is composed of nodes, and each of the nodes has inputs which come from previous layers and associated weights which are multiplied by each of the inputs. Collectively, these weights are referred to as the model parameters we mentioned earlier, and what is learned in the “learning” of deep learning is the optimal values for these numeric parameters to best predict the outcome.
Large language models are a category of deep learning models with the following properties:
They primarily work with language data (i.e. text), either as input, or output, or both - either solely or in conjuction with other data types (images, audio, video, etc.), in which case the LLMs are referred to as multimodal.
As mentioned above, LLMs are understood to be both very large in size in both model size (hundreds of millions, billions, hundreds of billions, or even trillions of parameters) as well as trained on very large datasets, comprising hundreds of millions or billions of tokens.
It is from the latter of these two properties that the remarkable capabilities of recent LLMs has arisen. There is one another important fundamental development which lead to the rise of LLMs as we know them today and that is the transformer architecture.
Transformers
We refer to the structure of a deep learning network as its architecture - the example showed in the previous section is that of the simplest type of deep learning model architecture referred to as a feed-forward or fully connected neural network, since the outputs of each node in the hidden layers serve as input for each node in the following layer.
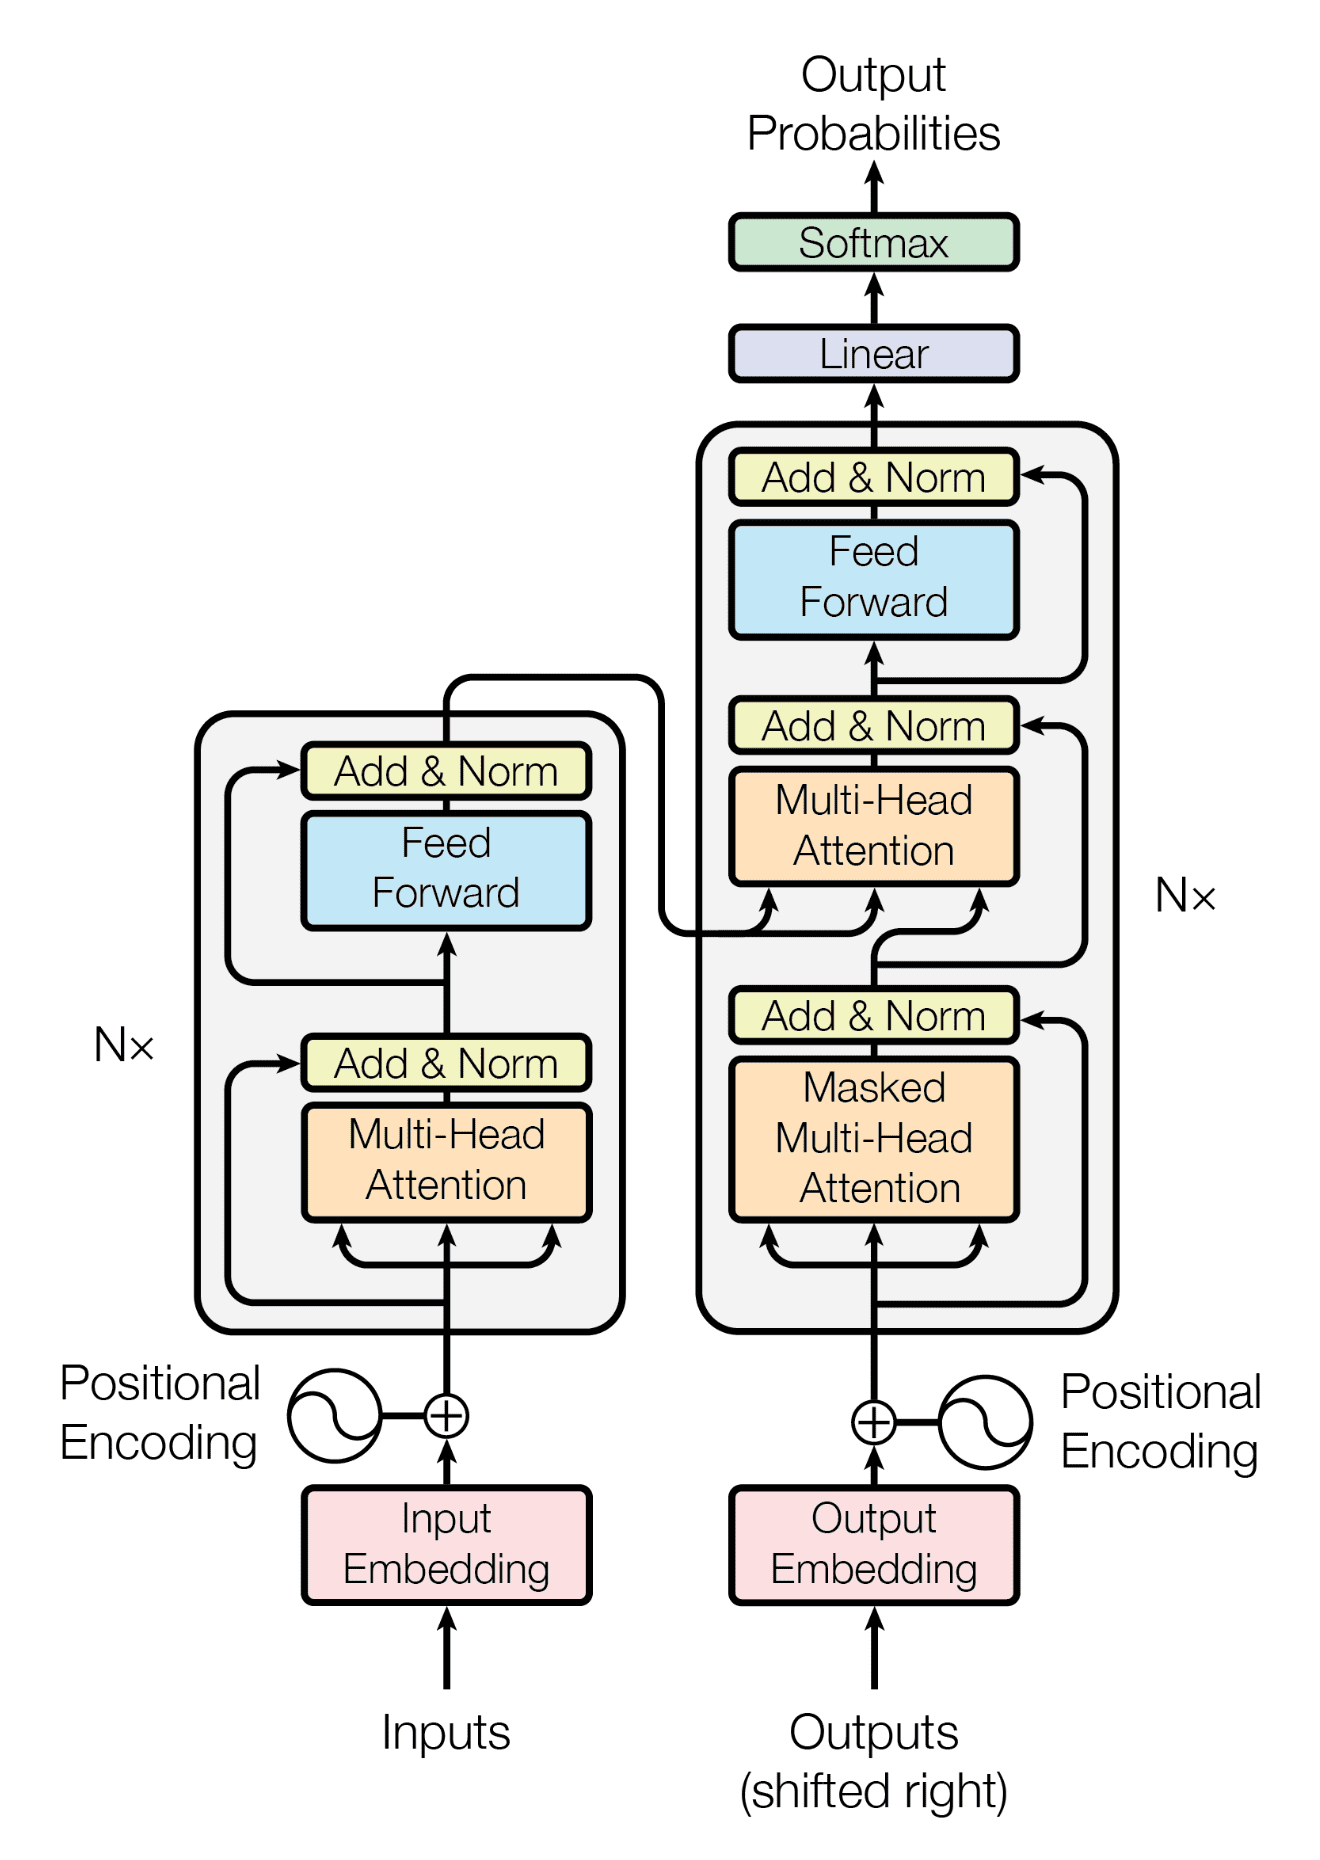
The Transformer architecture is an enitrely new type of neural network architecture of which the vast majority (but not all) large language models are. The Transformer was introduced fairly recently in the paper Attention is All You Need (Vaswani et al, 2018) by researchers from Google Brain.
As an interesting side note, contributors to the paper have moved on to notable AI startups
Aiden Gomez went on to be one of the founders of the OpenAI competitior Cohere
Noam Shazeer to co-found Character.ai.
While the mathematical and technical details of the transformer are very complex, we will not dive too deeply into these here. For anyone interested in checking out how these are implemented see Transformers from scratch.
Encoder and Decoder Model
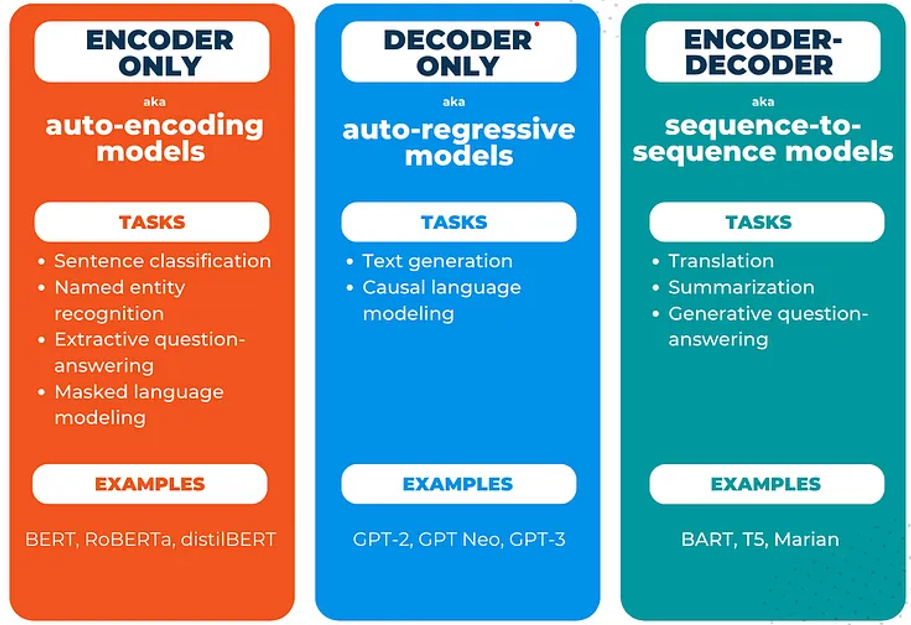
The transformer model is made up of two large blocks: the encoder block on the left, and the decoder block on the right. Encoder and decoder models have different tasks to which they are well-suited.
Encoder models take text as input and produce a higher dimensional representation of the dataset (corpus) of text - an embedding - on which they are trained.
Decoder models, on the other hand, take inputs and produces output probabilities. Most commonly, these are known for doing text generation, where the model take a sequence of text as input and makes predictions about the most likely occuring words which come next, as made famous by the Generative Pretrained Transformer (GPT) model by OpenAI.
Hugging Face
The GPT-2 (Generative Pre-trained Transformer 2) model was the last of the series of GPT models from OpenAI which was “open”. Following its release in 2019, GPT-3 and subsequent models did not have their weights made available publicly.
We can easily work with GPT-2 in Hugging Face. The easiest way to get results as quickly as possible is to use a pipeline to generate text i.e. to perform inference.
import torch
from transformers import pipeline
/home/sachi/git/data-science-sp26/.venv/lib/python3.14/site-packages/tqdm/auto.py:21: TqdmWarning: IProgress not found. Please update jupyter and ipywidgets. See https://ipywidgets.readthedocs.io/en/stable/user_install.html
from .autonotebook import tqdm as notebook_tqdm
for i in range(torch.cuda.device_count()):
   print(torch.cuda.get_device_properties(i).name)
AMD Radeon RX 9070 XT
AMD Ryzen 7 9800X3D 8-Core Processor
# for nvidia/amd gpus
device = "cuda" if torch.cuda.is_available() else "cpu"

# for apple silicon gpus
# device = 'mps' if torch.backends.mps.is_available() else "cpu"

print(device)
cuda
# create a pipeline of the GPT-2 model
gpt2_pipeline = pipeline('text-generation',
                        model='gpt2',
                        max_new_tokens=40,
                        num_return_sequences=3,
                        device=device
                        )
Loading weights: 100%|██████████| 148/148 [00:00<00:00, 26437.69it/s]
# Create 3 output generations
outputs = gpt2_pipeline("What's the dog doing?")
Setting `pad_token_id` to `eos_token_id`:50256 for open-end generation.
Both `max_new_tokens` (=40) and `max_length`(=50) seem to have been set. `max_new_tokens` will take precedence. Please refer to the documentation for more information. (https://huggingface.co/docs/transformers/main/en/main_classes/text_generation)
# Display the outputs

for out in outputs:
    display(Markdown("---"))
    display(Markdown(out['generated_text']))
display(Markdown("---"))We can see that even though we’ve only a few lines of code, Hugging Face has pulled down over half a gigabyte of data! These are the model weights for GPT-2.
Let’s take a look at what’s in the pipeline - it will contain both a tokenizer, for breaking inputs up into the tokens that GPT-2 expects, as well as a model, in this case, our GPT-2 model:
# Check the class of the tokenizer in the pipeline
type(gpt2_pipeline.tokenizer)transformers.models.gpt2.tokenization_gpt2.GPT2Tokenizer# Check the class of the model in the pipeline
type(gpt2_pipeline.model)transformers.models.gpt2.modeling_gpt2.GPT2LMHeadModelFurthermore, we can check the number of parameters of any Hugging Face model by calling the num_parameters method of a model object. How many parameters (weights) does our GPT-2 model have?
# Get the number of model parameters, format nicely with an f-string
f"{gpt2_pipeline.model.num_parameters()}"'124439808'Here we can see our GPT-2 model has just over 124 million parameters. Now we can move forward into generating some text using the model.
Text Generation
In this section, we will generate some text using the GPT-2 model, and also explore the different decoding methods for doing so, and the effect they have on outputs.
First, let us generate text from the pipeline using the default behavior. To do this, we simply pass in a string of text and no other arguments:
my_input_string = "The knights headed out at night"

# Generate output
outputs = gpt2_pipeline(my_input_string)
Setting `pad_token_id` to `eos_token_id`:50256 for open-end generation.
Both `max_new_tokens` (=40) and `max_length`(=50) seem to have been set. `max_new_tokens` will take precedence. Please refer to the documentation for more information. (https://huggingface.co/docs/transformers/main/en/main_classes/text_generation)
# Display the outputs

for out in outputs:
    display(Markdown("---"))
    display(Markdown(out['generated_text']))
display(Markdown("---"))Generative text models have parameters which control the amount of variability in their outputs; this is a desirable quality to make the outputs seem both more realistic (as if from a human) and variety being injected into the model outputs also increases the likelihood of reaching a novel result that is pleasing to the user and deemed to be “good”.
The two simplest decoding methods for text generation we will consider first are greedy search and beam search.
Greedy Search
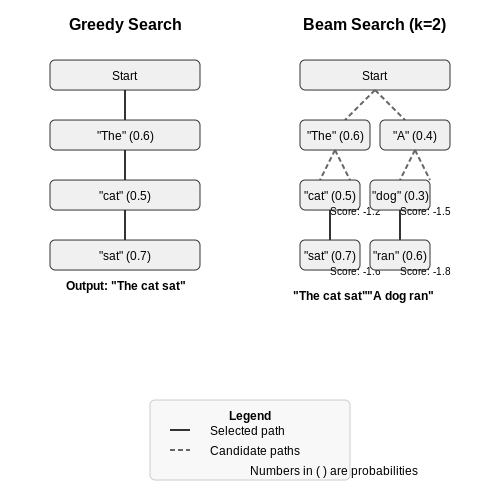
Greedy search is the simplest text generation approach: in this case, no variety is introduced as all. Recall a text generation model takes a sequence of input tokens and its task is to predict the next token given the input. For greedy search, the next predicted token is always just that with the highest probability.
from transformers import AutoTokenizer, AutoModelForCausalLM

# Instantiate the tokenizer
tokenizer = AutoTokenizer.from_pretrained("gpt2")
# add the EOS token as PAD token to avoid warnings
model = AutoModelForCausalLM.from_pretrained("gpt2", pad_token_id=tokenizer.eos_token_id).to(device)Loading weights: 100%|██████████| 148/148 [00:00<00:00, 34856.36it/s]
# Text input string
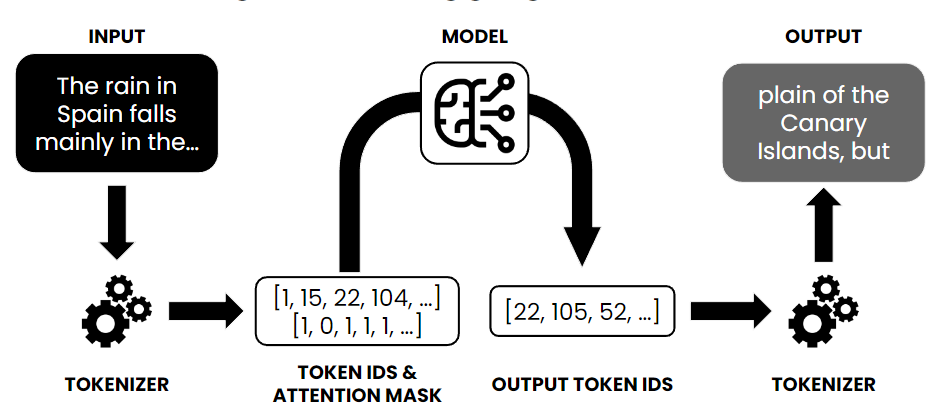
input_string = "The knights headed out at night"Great, now we have the tokenizer, model, and input string. We pass the input string into the tokenizer to get a back a list of token ids, as well as the attention mask for the transformer:
# encode context the generation is conditioned on
model_inputs = tokenizer(input_string, return_tensors='pt').to(device)

# Do greedy generation to generate the output token ids
greedy_output = model.generate(**model_inputs)

# Decode the tokens back to text using the tokenizer
output_string = tokenizer.decode(greedy_output[0])
Setting `pad_token_id` to `eos_token_id`:50256 for open-end generation.
/home/sachi/git/data-science-sp26/.venv/lib/python3.14/site-packages/transformers/generation/utils.py:1569: UserWarning: Using the model-agnostic default `max_length` (=26) to control the generation length. We recommend setting `max_new_tokens` to control the maximum length of the generation.
warnings.warn(
display(Markdown("---")) # dividing line
display(Markdown(output_string))
display(Markdown("---")) # dividing lineAnd that’s it! The whole text generation process goes like this:
Instantiate tokenizer and model
Pass input string to tokenizer to generate token ids and attention mask
Generate output token ids (predictions) from the model
Decode output token ids back into text using tokenizer
It should be noted that with greedy search, we will always be picking the most likely output tokens, and so the final result will be completely determinstic and the same each time.
Beam Search
Beam search is an improvement on greedy search which considers the most likely sequence of tokens together, based on their respective probabilities, as opposed to just taking the most probable individual token at each timestep.
A beam width is specified, and over the width of the beam (number of generated tokens), the combination of tokens with the highest collective probability is selected, as opposed to just selecting the individual token with the highest probability, as with greedy search.
To generate text with beam search in Hugging Face, we set the num_beams parameter to a value greater than 1 (which would be equivalent to greedy search) and early_stopping=True, so generation finishes when all beams pass back an “end of string” (EOS) token.
We have already created our tokenizer and model, so this can just be done in the call to model.generate():
# Text input string
input_string = "The knights headed out at night"

# Model input
model_inputs = tokenizer(input_string, return_tensors='pt').to(device)

# Generate output with beam search
greedy_output = model.generate(**model_inputs, num_beams=5, early_stopping=True)

# Decode the output
output_string = tokenizer.decode(greedy_output[0])
Setting `pad_token_id` to `eos_token_id`:50256 for open-end generation.
/home/sachi/git/data-science-sp26/.venv/lib/python3.14/site-packages/transformers/generation/utils.py:1569: UserWarning: Using the model-agnostic default `max_length` (=26) to control the generation length. We recommend setting `max_new_tokens` to control the maximum length of the generation.
warnings.warn(
display(Markdown(output_string))We can see that beam search has returned quite a different result from that of greedy search, by looking over the collective probabilities of a number of predicted token possibilities, instead of just each following token.
Ollama
Ollama is an open-source tool that makes it easy to run large language models (LLMs) on your local machine. Its purpose is to streamline the use of open-source LLMs without complex setup. Ollama provides a user-friendly platform that bundles model weights, configurations, and even datasets into a unified package (managed by a Modelfile) for each model.
For the list of available models check models being offerred by Ollama.
To get started with ollama we need two parts:
Install the ollama engine (which runs the models)
Setting up the python library to interface with it
Installation of Ollama (Engine/CLI): Ollama supports macOS, Linux, and Windows. See the download page.
# On macOS (using Homebrew):
brew install ollama


# On Linux (using the official install script):
curl -sS https://ollama.ai/install.sh | bash
This will install the Ollama CLI. Now you can pull any model you’d like (in this case I opt for Google’s gemma model)
ollama pull gemma3:270mThis command will download the model weights and set it up locally (the first time you run a model, Ollama will pull it automatically if not present). Make sure you have enough disk space and RAM for the model you choose; for instance, the 4B gemma model might require ~8GB RAM to run comfortably . You can list available models with ollama list and see details of a model with ollama show .
Installing the Python Library: With the Ollama engine ready and a model available, the next step is to install the Python SDK for Ollama. This library allows Python code to communicate with the Ollama backend via its REST API. Install it using pip:
pip3 install ollamaOnce it’s installed, you can test it with:
import ollama

result = ollama.generate(model='gemma3:270m', prompt='Where is Hunter College?')
print(result['response'])
Hunter College is located in New York City.
In this code, we call ollama.generate with a model name (here “gemma3” which we pulled earlier) and a prompt string. The model will process the prompt and the result (a dictionary) contains the model’s answer under the ‘response’ key.
Conversational Models
One of the most straightforward uses of Ollama is to create an AI chatbot. Because Ollama can run conversational models locally, you can build a private ChatGPT-style assistant.
Scenario: Imagine building a customer support chatbot or a personal assistant that runs entirely offline. Ollama’s local LLM will handle the natural language understanding and response generation.
How to build it: You would maintain a conversation history and continually send it to ollama.chat as the user interacts. For example:
import ollama

model_name = 'gemma3:270m'

# Initialize conversation with a system prompt (optional) and a user message
messages = [
    {"role": "system", "content": "You are a helpful assistant."},
    {"role": "user", "content": "Hello!"},
]


# First response from the bot
response = ollama.chat(model=model_name, messages=messages)
print("Bot:", response.message.content)


# Continue the conversation:
while True:
    user_input = input("You: ")
    if not user_input:
        break  # exit loop on empty input

    messages.append({"role": "user", "content": user_input})
    response = ollama.chat(model=model_name, messages=messages)
    answer = response.message.content

    print("You:", user_input)
    print("Bot:", answer)
    print()
    messages.append({"role": "assistant", "content": answer})
Bot: Hello! I'm happy to help. What can I do for you today?
You: Hi!
Bot: Hello! I'm happy to help. What can I do for you today?
You: Can you list 5 states in the USA
Bot: Okay, here are 5 states in the USA:
1. **California**
2. **Florida**
3. **Texas**
4. **New York**
5. **Illinois**
You: Very nice, and now can you list all 6 boroughs of New York City
Bot: Okay, here are the 6 boroughs of New York City:
1. **Greenwich**
2. **Tumin**
3. **Shibaya**
4. **Brooklyn**
5. **Queens**
6. **Manhattan**
You: Perfect, thank you.
Bot: You're welcome! I'm glad I could help. Is there anything else I can assist you with?
In this code:
We start with a system role that defines the assistant’s behavior (here simply instructing it to be helpful) and an initial user greeting.
We call ollama.chat with the conversation so far, and print the bot’s reply.
Then we enter a loop to keep reading user input and sending updated messages back to ollama.chat. We always append the newest user message and the assistant’s reply to the message list to maintain context.
The loop breaks on empty input (as a way to exit).
Ollama can be used to automate tasks and enhance workflows by leveraging AI capabilities. For example, you might use an LLM to summarize documents, generate reports, assist in coding, or interpret commands in an automation script.
Scenario: Suppose you have a daily workflow of reading through lengthy log files or meeting transcripts. You can use Ollama to automate summarization of these texts. This saves time by having the AI highlight key points for you.
How to do it: You can prompt an LLM to summarize or analyze text and integrate that into your pipeline. For instance:
import ollama

# Example: Summarize a paragraph of text
text = """
Linear regression is a fundamental method in statistics and machine learning used to model
the relationship between a dependent variable and one or more independent variables by
fitting a straight line (or hyperplane) to observed data. The goal is to find the
line that best predicts the outcome by minimizing the difference between the predicted
values and the actual data, typically using a technique called least squares method.
"""

prompt = f"Summarize the following text in one sentence:\n\"\"\"\n{text}\n\"\"\""

result = ollama.generate(model='gemma3:270m', prompt=prompt)

print("Summary:", result['response'])
Summary: The text describes linear regression as a statistical method for predicting dependent variables using a straight line to minimize the difference between predicted and actual values.
Here we took a piece of text and constructed a prompt asking the model to summarize it in one sentence.
Another automation example could be code generation or assistance.
code_prompt = "Write a Python function that checks if a number is prime."

response = ollama.generate(model='gemma3:270m', prompt=code_prompt)
display(Markdown(response['response']))